

Note on Cryptocurrency Part 2
NON-CUSTODIAL WALLETS, DEX OPERATIONS, AND FIAT GATEWAYS
1. Registration and Configuration of Web3 Wallets for Decentralized Finance (DeFi)
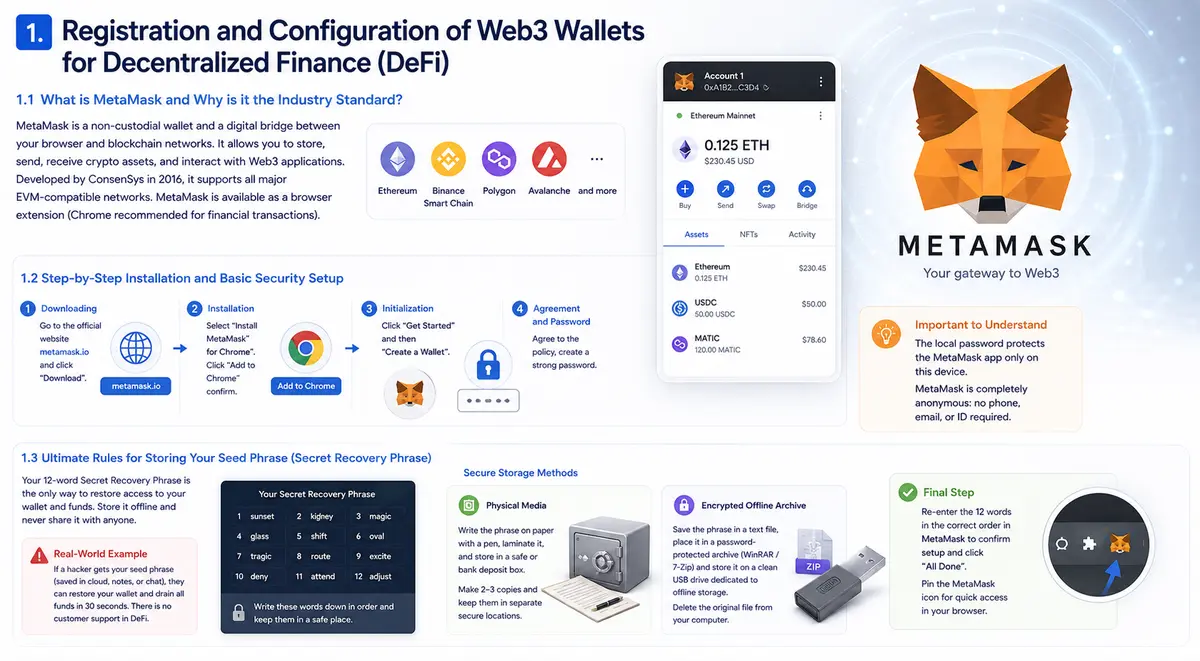
1.1 What is MetaMask and Why is it the Industry Standard?
To interact seamlessly with decentralized exchanges (DEX) and automated smart contracts, you will require a non-custodial online wallet. Unlike standard exchange accounts, a non-custodial wallet grants you absolute control over your digital assets. The most popular and versatile solution across the crypto industry is MetaMask.
MetaMask is a software cryptocurrency wallet that serves as a digital bridge between a traditional web browser and various blockchain networks. It allows users to receive, securely store, and send digital assets, as well as authenticate themselves on Web3 applications. Developed by ConsenSys in 2016, it currently supports the vast majority of EVM-compatible networks (such as Ethereum, Binance Smart Chain, Polygon, Avalanche, and others). MetaMask operates as a lightweight browser extension (it is highly recommended to use Google Chrome dedicated strictly to financial transactions, as outlined in the first part of this memo).
1.2 Step-by-Step Installation and Basic Security Setup
It is absolutely critical to download the wallet exclusively from official sources to avoid malicious phishing clones circulating on the web.
- Downloading: Navigate to the official website
[https://metamask.io](https://metamask.io)and click “Download” in the upper right corner. - Installation: Select “Install MetaMask for Chrome”. This will redirect you to the official Chrome Web Store. Click “Add to Chrome” and confirm by selecting “Add extension”.
- Initialization: In the automatically opened tab, click “Get Started” and then select “Create a Wallet”.
- Agreement and Password: Read the privacy data policy, click “I Agree”, and create a complex local password.
Crucial Concept to Understand: The local password you just created protects the application only on this specific computer from someone physically gaining access to your monitor. MetaMask is entirely anonymous: it is not linked to a phone number, email address, or passport.
1.3 Ultimate Rules for Storing Your Seed Phrase (Secret Recovery Phrase)
The only way to recover access to your funds if you delete your browser, experience a hardware failure, or forget your local password is the Secret Recovery Phrase (Seed Phrase), which consists of 12 words. During the setup process, the system will display these words to you. This is the single most vital piece of information in your crypto investment journey.
- Real-World Example: Imagine your seed phrase is the master key to a physical vault. If an investor saves these 12 words in their iCloud Notes or a Telegram chat, a hacker who gains access to the phone can easily restore the wallet on their own device and drain all funds within 30 seconds. In the decentralized world, there is no customer support system capable of reversing such a transaction.
Secure Storage Methods:
- Physical Media: Write the phrase down using a pen on a thick piece of paper, laminate it, and store it in a secure safe or a bank deposit box. Create 2-3 physical copies and store them in separate, secure locations.
- Encrypted Offline Archive: Save the phrase into a text document, place it inside an archive (such as WinRAR or 7-Zip) protected by a complex password. Move this archive to a clean USB flash drive dedicated solely to offline storage. Permanently delete the original source file from your computer.
Once you have securely stored your phrase, re-enter the words in the correct sequence within the MetaMask interface to confirm setup, and click “All Done”. For maximum convenience, pin the wallet icon via the puzzle piece icon in the top right corner of Chrome.
2. Scaling Wallet Capabilities: Adding Custom Blockchain Networks
2.1 Why Does a Wallet Need Multiple Networks?
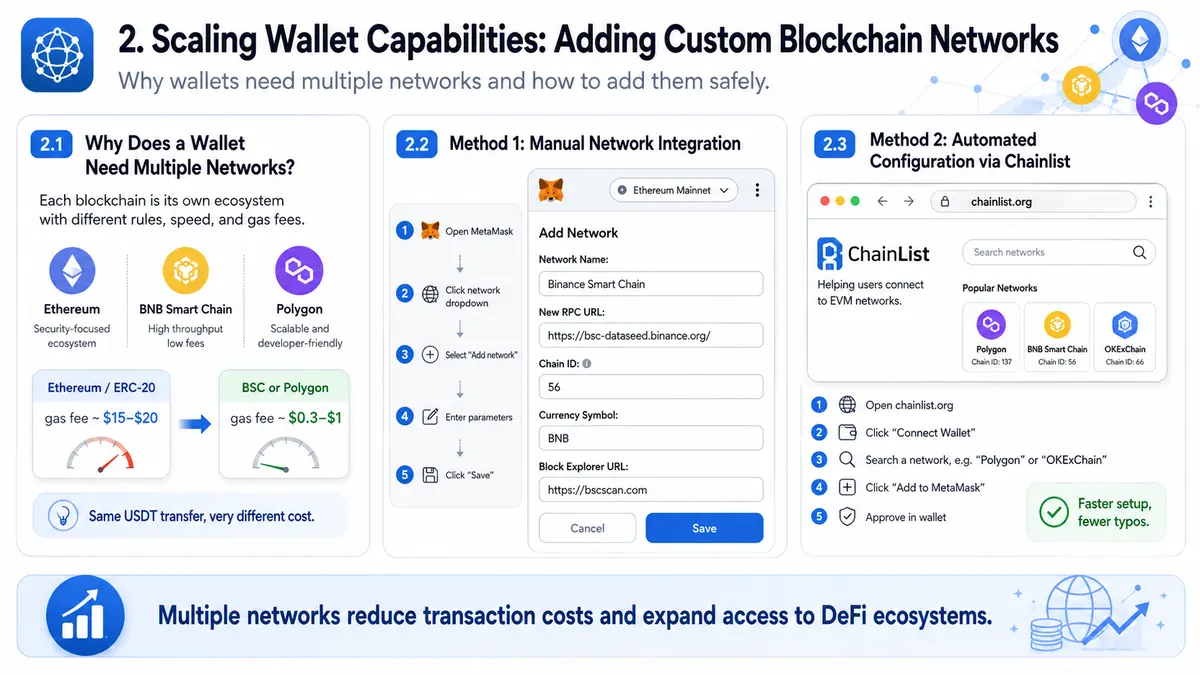
Each blockchain functions as an isolated ecosystem governed by its own native rules, transactional speeds, and gas fee models. Tokens cannot freely move across different blockchains natively. For example, Bitcoin operates on its own proprietary network, Ethereum (ETH) primarily utilizes the ERC-20 standard, and Binance (BNB) relies on the BEP-2 and BEP-20 standards. By default, MetaMask comes pre-configured only with the Ethereum Mainnet (which is notorious for its steep transaction fees). To purchase affordable tokens on alternative exchanges, other networks must be integrated.
- Practical Example: If you need to transfer USDT tokens using the Ethereum network, the transaction fee (gas) might cost anywhere from $15 to $20. However, performing the exact same transfer via the Binance Smart Chain (BSC) or Polygon network will cost a mere $0.3 to $1. This is why seasoned investors actively add multiple networks to minimize operational overhead.
2.2 Method 1: Manual Network Integration (Example: Binance Smart Chain)
- Open MetaMask, click on the network selection dropdown at the top, and select “Add network”.
- Accurately fill in the technical parameters of the desired blockchain:
- Network Name: Binance Smart Chain
- New RPC URL:
[https://bsc-dataseed.binance.org/](https://bsc-dataseed.binance.org/) - Chain ID: 56
- Currency Symbol: BNB
- Block Explorer URL:
[https://bscscan.com](https://bscscan.com)
- Click “Save”. The BSC network is now successfully integrated, allowing you to interact with the Binance ecosystem.
2.3 Method 2: Automated Configuration via Chainlist
To save time and mitigate typos, professional traders utilize dedicated network aggregators.
- Navigate to the trusted service web address:
[https://chainlist.org](https://chainlist.org). - Click “Connect Wallet” in the upper right corner and authorize the connection via the MetaMask pop-up window.
- Use the search bar at the top to type the name of the network you want to add, such as OKExChain (OKT) or Polygon (MATIC).
- Click “Add To Metamask” under the desired network entry and approve the network addition directly inside your wallet extension. This completely eliminates the risk of manual parameter errors.
3. Navigating and Transacting on Decentralized Exchanges (DEX)
Decentralized exchanges (such as PancakeSwap or Uniswap) operate entirely through automated smart contracts directly on peer-to-peer networks. They do not require account registration, identity verification, or custody of your funds.
3.1 Wallet Synchronization and Exchange Mechanics on PancakeSwap
Let us examine the trading workflow using PancakeSwap, the dominant DEX on the BNB Chain.
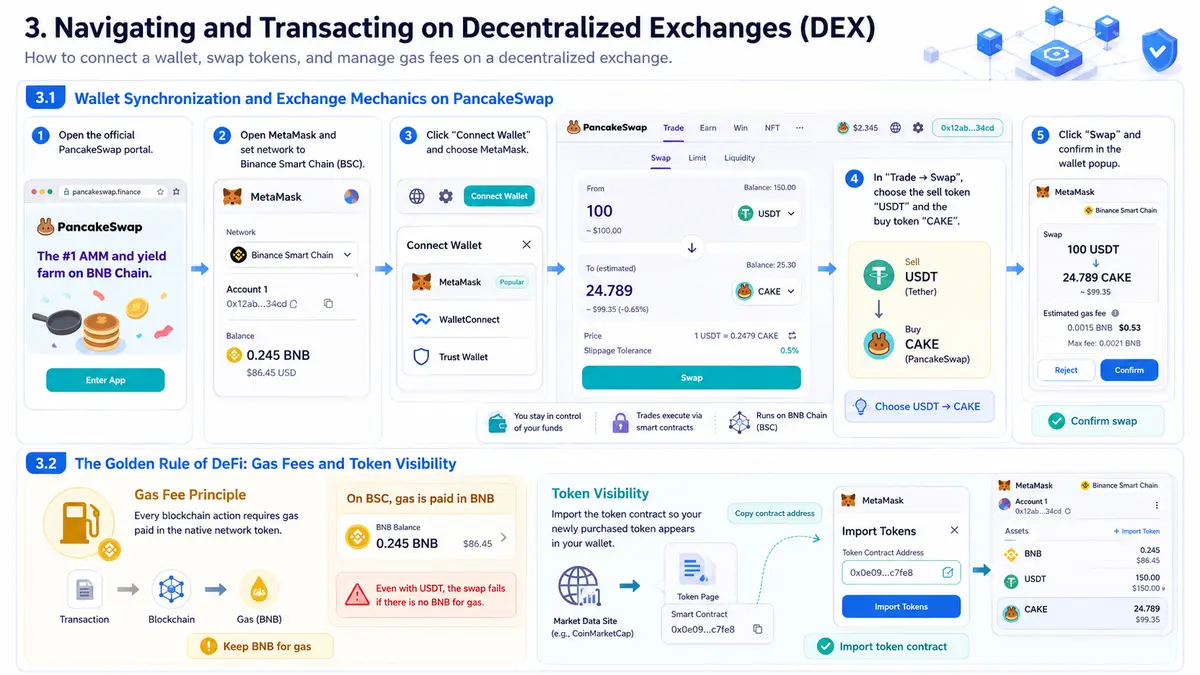
- Navigate to the official portal:
[https://pancakeswap.finance](https://pancakeswap.finance). - Open MetaMask and ensure your network dropdown is set to Binance Smart Chain (BSC).
- On the PancakeSwap interface, click “Connect Wallet” and choose MetaMask. Approve the synchronization inside your wallet.
- Head over to the “Trade” -> “Swap” section. In the top asset field, select the token you wish to sell (e.g., USDT). In the bottom field, choose the token you want to buy (e.g., CAKE).
- Click “Swap” and sign the transaction inside the MetaMask extension pop-up.
3.2 The Golden Rule of DeFi: Gas Fees and Token Visibility
- The Gas Fee Principle: To execute any operation on a blockchain (transfers, token swaps, staking), you must pay a network fee to the miners or validators. This fee is known as “Gas” and is always paid in the native currency of that specific network.
- Example: When swapping tokens on PancakeSwap (BSC network), the network fee is paid in native BNB tokens. Even if you hold $10,000 worth of USDT in your wallet, the transaction will fail if you do not have at least $2 worth of BNB to cover the gas fee. Always maintain a small reserve of the network’s native token for transaction processing.
To ensure a newly purchased token shows up in your wallet balance, navigate to CoinMarketCap, locate the cryptocurrency page, copy its smart contract address from the “Contracts” section, and paste it into MetaMask using the “Import Tokens” feature.
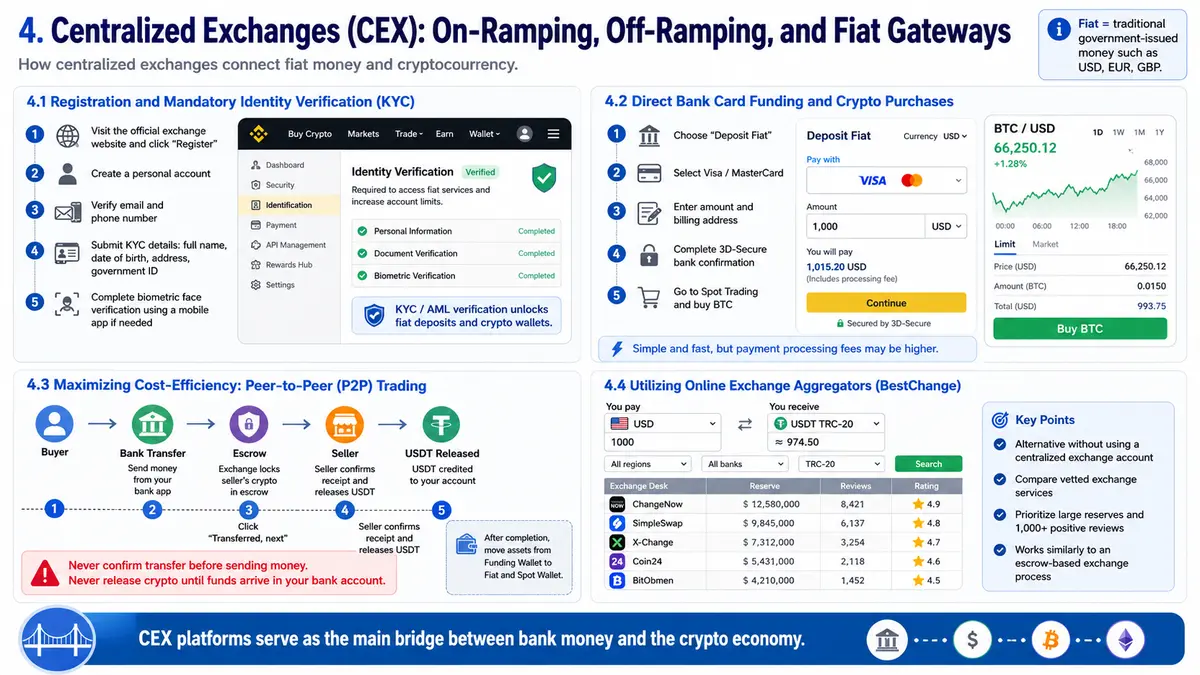
4. Centralized Exchanges (CEX): On-Ramping, Off-Ramping, and Fiat Gateways
Centralized Exchanges (CEX), like Binance, function as commercial platforms managing order-book matching as a trusted intermediary. They act as the primary financial bridge for converting traditional government-backed currency into cryptocurrency and vice versa.
Terminology Check: Fiat (fiduciary) money refers to conventional state-issued currencies (e.g., USD, EUR, GBP). Their value is established and backed by sovereign governments rather than physical commodities like gold.
4.1 Registration and Mandatory Identity Verification (KYC)
Because centralized exchanges bridge the gap with the traditional banking sector, they must strictly adhere to Know Your Customer (KYC) and Anti-Money Laundering (AML) regulations.
- Navigate to the official platform:
[https://www.binance.com](https://www.binance.com)and hit “Register”. - Select your country of residence and choose “Create Personal Account” (intended for individual retail investors).
- Complete the initial registration steps: provide a valid email address and verify it, then enter your mobile phone number and verify it using the security codes received via text and email.
- Identity Verification (KYC): To unlock access to fiat deposits and crypto wallets, you must provide your full name, date of birth, residential address, and upload high-resolution photos of a government-issued ID (passport or driver’s license).
- Biometric Face Verification: If your desktop workstation lacks a camera, download the official Binance mobile application on your iOS or Android device. Tap the QR scanner in the app, point your phone camera at the QR code displayed on your PC screen, and complete the live biometric face scan via your smartphone. The review process typically concludes within 20 minutes.
Operational Note: If you encounter issues during biometric verification (e.g., lighting issues or document glare), open a ticket with customer support. Technical agents can assist you through the verification process manually.
4.2 Direct Bank Card Funding and Crypto Purchases
The most straightforward method to fund an account is using a standard credit or debit card, though it may incur higher payment processing fees.
- In the main navigation bar, select “Deposit Fiat”.
- Choose your payment method (Visa/MasterCard) and specify the amount you want to deposit.
- Input your card credentials and fill out the Billing Address field accurately. Ensure this matches the residential address tied to your bank account.
- Complete the 3D-Secure authentication code sent by your bank.
- Once your fiat balance reflects the funds, navigate to “Trade” -> “Spot”, find your target trading pair (e.g., BTC/fiat), enter your order size, and click “Buy BTC”.
4.3 Maximizing Cost-Efficiency: Peer-to-Peer (P2P) Trading
P2P (Peer-to-Peer) trading is an alternative asset allocation model where users trade directly with one another. The exchange acts solely as an escrow service to guarantee trade integrity, allowing users to buy crypto with zero platform fees.
- How it Works in Practice: Imagine you want to buy crypto-dollars (USDT) using a localized bank transfer. You navigate to the Binance P2P marketplace, filter by your preferred local bank, and click “Buy” on a reputable merchant’s listing. Binance instantly locks the seller’s USDT in an escrow account. You open your local mobile banking app and manually transfer the fiat money directly to the seller’s bank account. Once sent, you click “Transferred, next”. The seller verifies their bank balance, confirms receipt of the funds, and releases the escrow. The USDT is instantly credited to your Funding Wallet.
Safety Rule: Never click “Transferred, next” if you haven’t actually sent the money. Conversely, if you are selling crypto, never release the assets until you see the money settled in your actual bank account (do not rely on text messages or payment receipts).
Once the P2P transaction is complete, transfer the digital assets from your “Funding Wallet” to your “Fiat and Spot” wallet inside Binance by using the internal transfer interface to begin spot trading.
4.4 Utilizing Online Exchange Aggregators (BestChange)
If you prefer not to register on centralized exchanges or undergo KYC identity verification, you can utilize independent online exchange services. To find verified platforms, use the trusted aggregator BestChange ([https://www.bestchange.ru](https://www.bestchange.ru)).
The workflow is identical to a P2P system, but the escrow and counterparty guarantees are overseen by the BestChange platform itself rather than a centralized exchange entity. In the left-hand configuration column, select the fiat payment method you wish to spend, and in the right-hand column, select the cryptocurrency you want to receive (e.g., USDT TRC-20). The site will compile a live roster of vetted exchange desks. Prioritize services with large reserve sizes and at least 1,000+ positive user reviews before initiating an exchange.

Comments
No comments yet. Be the first to share your thoughts!
Authentication Required
You must be logged in to post a comment.